Functional Manual Therapy (FMT) is a dynamic, evidence-based approach combining manual techniques with a focus on enhancing mobility and brain-controlled movement to address musculoskeletal issues and improve overall function.
Definition and Overview
Functional Manual Therapy (FMT) is a comprehensive, evidence-based approach that combines advanced manual techniques with a focus on enhancing mobility, movement patterns, and brain-controlled motor functions. It is designed to address musculoskeletal and neurological dysfunctions, aiming to restore efficient mobility and reduce pain. FMT emphasizes a full-body, integrative approach, recognizing the interconnectedness of soft tissues, joints, and nervous system function. This therapy incorporates techniques such as soft tissue mobilization, joint manipulation, and neuromobilization to identify and treat movement limitations. By addressing the root causes of dysfunction, FMT not only alleviates symptoms but also improves overall physical function and quality of life. It is a dynamic, adaptable method tailored to individual patient needs, making it highly effective for a wide range of conditions and populations.
Historical Background and Development
Functional Manual Therapy (FMT) has its roots in the evolution of manual therapy practices, drawing from osteopathic principles and advanced physical therapy techniques. Developed by Gregg and Vick Johnson, FMT emerged as a revolutionary approach to physical therapy, focusing on restoring efficient mobility and reducing pain through systematic, evidence-based methods. The therapy integrates soft tissue mobilization, joint manipulation, and neuromobilization, reflecting decades of clinical experience and research. Over time, FMT has evolved to incorporate cutting-edge insights into movement analysis and brain-body interactions, making it a dynamic and adaptable system for addressing musculoskeletal and neurological challenges. Its development underscores the importance of a holistic, full-body approach in rehabilitation and performance enhancement.
Core Principles of Functional Manual Therapy
Functional Manual Therapy emphasizes a full-body, evidence-based approach, integrating manual techniques to enhance mobility, reduce pain, and restore movement efficiency through brain-body connection and optimal function.
Full-Body Approach and Integration
Functional Manual Therapy (FMT) adopts a comprehensive, full-body approach, addressing the entire musculoskeletal system rather than isolated areas. This method integrates advanced manual techniques with a focus on improving mobility, reducing pain, and enhancing overall physical function. By considering the interconnectedness of soft tissues, joints, and nervous system, FMT ensures a holistic treatment strategy. It emphasizes the restoration of efficient movement patterns, which are essential for optimal body function. The approach also incorporates elements of nutrition and lifestyle education to support long-term recovery and wellness. This integrated system allows therapists to address movement dysfunctions effectively, promoting a balanced and coordinated body. FMT’s focus on the whole person ensures a more sustainable and comprehensive path to recovery and improved mobility.
Scientific and Evidence-Based Foundations

Functional Manual Therapy (FMT) is grounded in scientific research and evidence-based principles, ensuring its effectiveness in addressing musculoskeletal and neurological conditions. Studies by BF Koçyiğit (2021) and DV Skvortsov (2024) highlight the systematic integration of manual techniques with a focus on improving mobility and brain-controlled movement. These studies validate FMT’s approach, demonstrating its ability to restore efficient movement patterns and reduce pain. The therapy’s foundations are supported by empirical data, emphasizing the importance of skilled palpation and mobilization skills. By combining advanced anatomical knowledge with evidence-based methods, FMT provides a reliable framework for physical therapists to diagnose and treat movement dysfunctions. Its scientific underpinnings ensure that FMT remains a trusted and effective approach in modern physical therapy practice.

Techniques and Methods in FMT
Functional Manual Therapy incorporates a variety of advanced methods, including soft tissue mobilization, joint manipulation, neuromobilization, and post-isometric relaxation, to restore optimal mobility and function.

Soft Tissue Mobilization
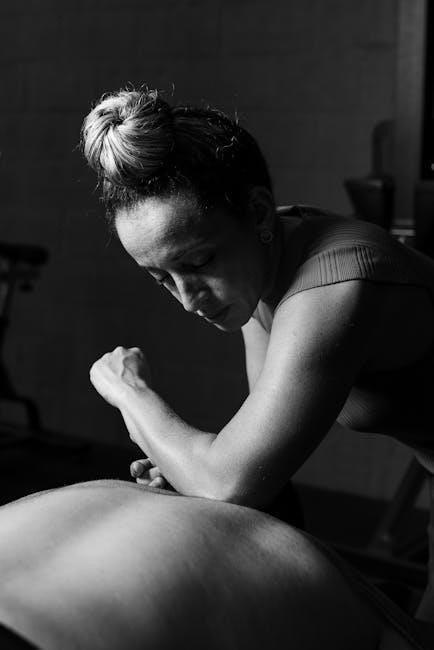
Soft tissue mobilization is a cornerstone technique in Functional Manual Therapy, focusing on the manipulation of muscles, tendons, and ligaments to restore optimal mobility and reduce pain. This method combines targeted pressure and stretching to release tension, improve circulation, and eliminate inflammation in soft tissues. By addressing rigid muscles and fascial restrictions, it enhances flexibility and promotes healing. Practitioners use advanced palpation skills to identify areas of dysfunction, applying specific manual techniques to restore normal tissue function. This approach is particularly effective for treating chronic pain, scar tissue, and movement limitations, making it a vital component of FMT’s comprehensive treatment strategy.
Joint Mobilization and Manipulation
Joint mobilization and manipulation are key techniques in Functional Manual Therapy, focusing on restoring joint mobility and reducing pain. These methods involve skilled, hands-on interventions to improve joint movement and reduce stiffness. Mobilization techniques often include gentle, oscillatory movements to enhance joint lubrication and reduce inflammation, while manipulation may involve more direct, controlled forces to address joint restrictions. These approaches are designed to restore normal joint mechanics, improve range of motion, and alleviate pain associated with musculoskeletal conditions. By targeting specific joint dysfunctions, joint mobilization and manipulation play a crucial role in FMT’s goal of enhancing overall mobility and functional movement patterns. These techniques are evidence-based and tailored to individual patient needs, making them a cornerstone of FMT practice.

Neuromobilization and Proprioceptive Techniques
Neuromobilization and proprioceptive techniques in Functional Manual Therapy focus on improving nerve mobility and enhancing sensory feedback to optimize movement. These methods address restrictions in nerve glide, reducing tension and inflammation. Proprioceptive techniques target sensory receptors to improve joint position sense and motor control. By restoring proper neural function, these approaches help patients achieve smoother, more efficient movements. Neuromobilization is particularly effective in addressing conditions involving nerve entrapment or impaired sensory feedback. These techniques are often combined with other FMT methods to create a comprehensive treatment plan. The integration of neuromobilization and proprioceptive work ensures that both the nervous system and musculoskeletal system are addressed, promoting long-term functional improvement and pain reduction. These techniques highlight FMT’s holistic approach to rehabilitation and movement restoration.
Post-Isometric Relaxation and Functional Massage
Post-Isometric Relaxation (PIR) and Functional Massage are integral techniques in Functional Manual Therapy, designed to enhance muscle relaxation and improve tissue mobility. PIR involves brief isometric contractions followed by targeted relaxation, reducing muscle spasms and improving joint range of motion. Functional Massage focuses on restoring circulation, reducing muscle tension, and promoting tissue repair. These methods address soft tissue restrictions, scar tissue, and chronic inflammation, fostering a balanced musculoskeletal system. By combining PIR and massage, therapists can create a comprehensive treatment plan that alleviates pain, enhances flexibility, and supports overall functional recovery. These techniques are particularly effective for patients with chronic pain, muscle imbalances, or limited mobility, offering a gentle yet profound approach to restoring optimal physical function.

Applications and Effectiveness of FMT
Functional Manual Therapy effectively treats chronic pain, muscle imbalances, and limited mobility. Techniques like Soft Tissue Mobilization enhance joint function, improving overall musculoskeletal health and movement efficiency.
Conditions Treated and Patient Populations
Functional Manual Therapy (FMT) effectively addresses a wide range of musculoskeletal and neurological conditions, including chronic pain, joint dysfunctions, and movement limitations. It is particularly beneficial for patients with soft tissue injuries, post-surgical rehabilitation, and those suffering from chronic conditions like fibromyalgia. FMT is also highly effective for athletes seeking to enhance performance and prevent injuries. The therapy is adaptable to diverse patient populations, from geriatric clients aiming to improve mobility to individuals recovering from trauma or neurological disorders. Its holistic approach ensures personalized care, making it suitable for patients with complex or multifaceted conditions. By targeting the root causes of dysfunction, FMT helps restore optimal movement and function, improving overall quality of life for individuals across various age groups and health statuses.
Scientific Evidence and Research Support
Functional Manual Therapy (FMT) is supported by a growing body of scientific evidence, demonstrating its effectiveness in improving mobility, reducing pain, and enhancing functional outcomes. Studies highlight the benefits of FMT’s integrated approach, combining manual techniques with movement analysis and patient education. Research by BF Koçyiğit (2021) and DV Skvortsov (2024) underscores its evidence-based foundations, showing positive results in addressing musculoskeletal and neurological conditions. The therapy’s focus on soft tissue mobilization, joint manipulation, and neuromobilization is backed by clinical trials proving its efficacy in restoring optimal movement patterns. Ongoing research continues to validate FMT’s role in rehabilitation and performance enhancement, solidifying its place as a reliable, science-driven treatment option in physical therapy.
Expert Insights and Perspectives
Gregg and Vick Johnson pioneered Functional Manual Therapy, introducing innovative techniques that restore efficient mobility and reduce pain through precise movement patterns and hands-on approaches.
Gregg and Vick Johnson’s Contributions

Gregg and Vick Johnson are pioneers in Functional Manual Therapy, developing innovative techniques that integrate manual therapy with movement patterns to restore efficient mobility and reduce pain. Their approach emphasizes the brain-body connection, focusing on how movement dysfunctions contribute to pain and limited mobility. They introduced systematic methods to identify and address these issues, combining soft tissue mobilization, joint manipulation, and neuromobilization. Their work has significantly influenced physical therapy, offering a holistic, evidence-based framework that considers nutrition, lifestyle, and overall physical function. The Johnsons’ contributions have empowered therapists to address a wide range of musculoskeletal conditions, enhancing patient outcomes and advancing the field of manual therapy.
Functional Manual Therapy (FMT) has emerged as a groundbreaking approach in physical therapy, offering a holistic and evidence-based framework to address musculoskeletal disorders. By integrating manual techniques with a focus on mobility, movement patterns, and brain-body interaction, FMT has proven effective in restoring function and reducing pain. As research continues to validate its benefits, FMT is likely to expand its applications, incorporating advancements in technology and personalized care. Future directions may include greater emphasis on preventive strategies, nutrition, and lifestyle education, further solidifying its role in modern rehabilitation. With its adaptable and scientifically-rooted methods, FMT remains a promising avenue for improving patient outcomes and advancing the field of physical therapy.